Creating a React/Redux JupyterLab Extension
24 Apr 2020
In this blog post, I’d like to demonstrate how to create a demo JupyterLab extension that leverages React and Redux (along with Typescript).
This is what we’ll end up with:
Documentation of React-enabled JupyterLab widgets is scarce and not always up to date. I hope to rectify that with this post. We’re going to do the following:
- Set up our dev environment
- Run
cookiecutterto create the basic structure and dependencies of a new extension.- You don’t need to complete this step if you’re using my repository, this is already done for you.
- Set up React-specific parts of the app
Of course, if you’d rather learn by reading code, just go ahead and skip to my Github repository.
Getting Started
By the way, many of these steps are directly pulled from this tutorial on creating extensions. If you’re unfamiliar with JupyterLab Extensions, this tutorial is a great resource!
If you don’t use conda, you can achieve similar results with other virtual environment managers. See here for other installation methods
We’re going to use conda to manage all of the our Python dependencies.
We’re going to create a new conda environment called jl-extension-env
conda create -n jl-extension-env -c conda-forge jupyterlab cookiecutter nodejs git
We can activate and deactivate this environment like so (we’ll automate this using iTerm2 in a moment.)
# Activate this environment when working on this repository
conda activate jl-extension-env
# Deactivate it otherwise
conda deactivate
Running cookiecutter
Note: skip this step if you’re just copying my repository as a starting point. This has already been done for you.
Run the following command wherever you’d like to create your new project.
cookiecutter https://github.com/jupyterlab/extension-cookiecutter-ts
Answer the prompts and then navigate into the newly created directory.
Installing the extension locally
Let’s install dependencies and link our development version of the extension with JupyterLab.
# Install dependencies and build the Typescript source
yarn && yarn build
# Link your development version of the extension with JupyterLab
jupyter labextension link .
You can watch the source directory for changes. Use the following commands.
yarn watch
jupyter lab --watch
Or… try my script to automatically open two tabs and run watch mode in both of them.
Working with React and Redux
Okay, so the gist of how a JupyterLab extension works is this.
There is an extension object that runs everything (located in index.ts). A MainAreaWidget is created, and we will attach our React app to that widget by extending JupyterLab’s ReactWidget.
We create a new class called ReactAppWidget, which extends ReactWidget. We override the render function and set up our <Provider> (which will handle our Redux store), and we render our <AppComponent>.
Note: I haven’t experimented with Context yet in the JupyterLab setting, but theoretically you would wrap your ContextProvider around <AppComponent /> here as usual.
That’s pretty much it! <AppComponent /> can be any valid React that you’d like - this render function is similar to a normal React app’s index.tsx entry point.
I’ve used redux-toolkit to manage the application’s store - if you’re not familiar with redux-toolkit, it is essentially the CreateReactApp of Redux. It provides a set of boilerplate best practices to get your project hooked up and running quickly. I personally love this library.
Go forth and develop!
You’re all ready to go! Start both watch modes, and you’re in business!
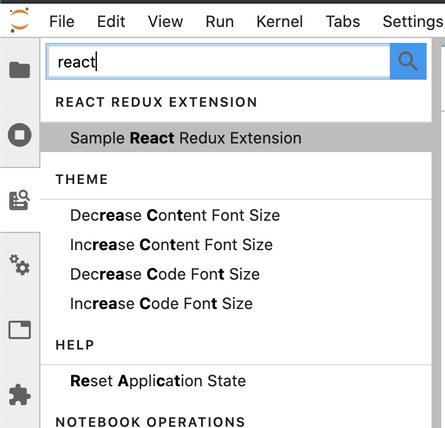
Once JupyterLab opens in your browser, click the “Commands” icon, and search for “Sample React Redux Extension”.
You’ll then see this neat app!
Congratulations, you’re ready to begin working on your very own React/Redux JupyterLab extension!
I hope this guide has been helpful. If you have any issues getting this to work, please open an issue on my Github repository.
Troubleshooting and other issues
- There is some funky behavior related to closing and re-opening the extension in the same session.
- It is probably 100% my fault. I’ll fix the repo if/when I figure it out.
- For now, this is left as an exercise for the reader :)
- Sometimes
watchmode doesn’t seem to refresh very well. Try manually refreshing your page in the browser after making changes.- If that doesn’t work, just close your JupyterLab tabs and re-open them,
- If you get build errors when uninstalling the extension locally, try unlinking it as well
jupyter labextension unlink [your-extension-name]
Related Posts
Helpful Bash Script - git reset all
22 Sep 2021Get a Pull Request by Number - Bash Function
22 Sep 2021Creating Effective Presentations with stock Apple applications
21 Sep 2021Air Cooling a Buttkicker Gamer 2
27 Feb 2021

