A Basic Ram Robot In Robocode
09 Apr 2014
Hi, this is my basic ramming bot. I hope it gives you some ideas regarding moving, firing, and following other bots. This bot is not very intelligent, it loses about 70% of the time to my advanced targeting robot.
However, it is useful and instructive to run this bot against something you’re developing, as it is good at exposing big movement weaknesses - this bot will win if you let it follow you around the map!
To download the package for importing into Robocode, click the button.
def/def_rammer_a1.class
def/def_rammer_a1.java
def/def_rammer_a1.properties
—- Codesize —- Codesize: 1052 bytes Robot weight class: MiniBot (codesize < 1500 bytes)
package def;
import robocode.*;
import static robocode.util.Utils.normalRelativeAngleDegrees;
import java.awt.Color;
// API help : <a href="http://robocode.sourceforge.net/docs/robocode/robocode/Robot.html">http://robocode.sourceforge.net/docs/robocode/robocode/Robot.html</a>
/**
* def_rammer_a1 - a robot by Davis Ford
*/
public class def_rammer_a1 extends Robot
{
/**
* I have added some initialization values here to keep track of stats in rounds.
* The hope is that I can use these counters to help me plan my next steps. They aren't useful except for debugging/getting better at the game.
*/
int turnDirection = 1; // Clockwise or counterclockwise
double timesHitWall=0;
double timesShootBullet=0;
double timesHitOpponent=0;
double timesMissedOpponent=0;
double timesRammedOpponent = 0;
double timesHitByOpponent = 0;
public void run() {
setBodyColor(Color.pink);
setGunColor(Color.pink);
setRadarColor(Color.pink);
setScanColor(Color.pink);
setBulletColor(Color.pink);
while (true) {
turnRight(5 * turnDirection);
}
}
/**
* onScannedRobot: What to do when you see another robot
* In this case, if we happen to scan a robot, we will fire
*/
public void onScannedRobot(ScannedRobotEvent e) {
// Calculate exact location of the robot
double absoluteBearing = getHeading() + e.getBearing();
double bearingFromGun = normalRelativeAngleDegrees(absoluteBearing - getGunHeading());
// If it's close enough, fire!
if (Math.abs(bearingFromGun) <= 3) {
turnGunRight(bearingFromGun);
// We MUST check getGunHeat(), because if it's greater than 0 and we attempt to fire(), we will lose a turn
// If getGunHeat = 0, we are allowed to shoot. Consult the wiki for more on barrel heat and shooting.
if (getGunHeat() == 0) {
fire(Math.min(3 - Math.abs(bearingFromGun), getEnergy() - .1));
}
}
if (e.getBearing() >= 0) {
turnDirection = 1;
} else {
turnDirection = -1;
}
turnRight(e.getBearing());
ahead(e.getDistance() + 5);
scan(); // Might want to move ahead again!
}
/**
* onHitByBullet: What to do when you're hit by a bullet
* In our case, we're just printing to the console. THis is a VERY basic rambot, better ones would dodge.
*/
public void onHitByBullet(HitByBulletEvent e) {
out.println(e.getName() + " hit me with a " + e.getPower() + " power shot");
out.println("My energy is " + getEnergy());
timesHitByOpponent++; //This updates our counter, you will see this frequently in my code, I enjoy verbose robot outputs.
//They help me debug behavioral problems
}
/**
* onHitWall: What to do when you hit a wall
*/
public void onHitWall(HitWallEvent e) {
// Bounce off, and log it.
turnRight (e.getBearing());
timesHitWall++;
out.println("I have hit a wall " + timesHitWall + " times this round.");
}
/**
* onBulletHit: What to do when you hit the enemy with a bullet
*/
public void onBulletHit(BulletHitEvent e) {
out.println("I hit " + e.getName());
out.println(e.getName() + " has " + e.getEnergy() + " Energy remaining");
timesHitOpponent++;
}
/**
* onBulletMissed: What to do when our shot misses.
*/
public void onBulletMissed(BulletMissedEvent event) {
timesMissedOpponent++;
}
/**
* This is the most important part of this bot, since it's a rammer.
*/
public void onHitRobot(HitRobotEvent e) {
if (e.getBearing() >= 0) {
turnDirection = 1;
} else {
turnDirection = -1;
}
turnRight(e.getBearing());
if(getGunHeat() == 0){
if (e.getEnergy() > 16) {
fire(3);
timesShootBullet++;
} else if (e.getEnergy() > 10) {
fire(2);
timesShootBullet++;
} else if (e.getEnergy() > 4) {
fire(1);
timesShootBullet++;
} else if (e.getEnergy() > 2) {
fire(.5);
timesShootBullet++;
} else if (e.getEnergy() > .4) {
fire(.1);
timesShootBullet++;
}
}
ahead(40); // Ram him again!
timesRammedOpponent++;
}
/*
* This chunk is just for debrief after a round. I'm trying to pin down how many times I am hitting the fucking wall!
*/
public void onRoundEnded(RoundEndedEvent e) {
out.println("-----------END OF ROUND--------------");
out.println("Walls hit: " + timesHitWall);
out.println("Shots: " + timesShootBullet);
out.println("Hits: " + timesHitOpponent);
out.println("Misses: " + timesMissedOpponent);
out.println("Accuracy: " + (timesHitOpponent / timesShootBullet) * 100 + "%");
out.println("Ramming Incidents: " + timesRammedOpponent);
out.println("Hit By Enemy Bullets: " + timesHitByOpponent);
}
public void onDeath(DeathEvent e) {
out.println("-----------I DIED--------------");
out.println("Walls hit: " + timesHitWall);
out.println("Shots: " + timesShootBullet);
out.println("Hits: " + timesHitOpponent);
out.println("Misses: " + timesMissedOpponent);
out.println("Accuracy: " + (timesHitOpponent / timesShootBullet) * 100 + "%");
out.println("Ramming Incidents: " + timesRammedOpponent);
out.println("Hit By Enemy Bullets: " + timesHitByOpponent);
}
public void onWin(WinEvent e) {
// Victory dance
turnRight(36000);
}
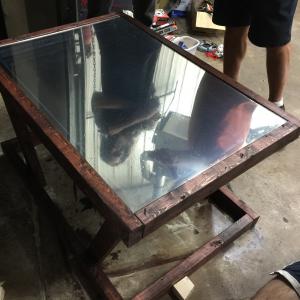
}Building An Arduino-Powered Infinity Table
03 Mar 2014
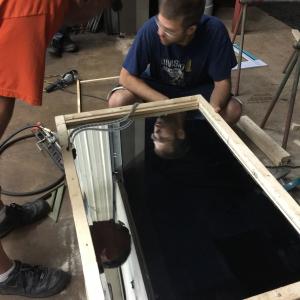
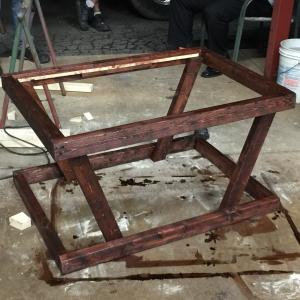
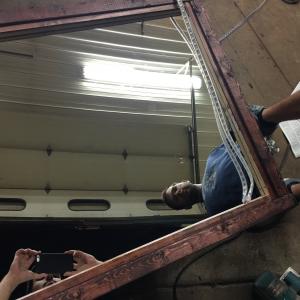
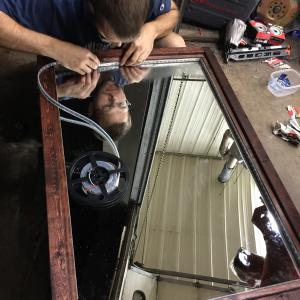
The Task
Matt Ibarra and I wanted a fun project. My girlfriend Amanda wanted a table. I wanted to program LEDs.Thus, we decided on an Infinity table. We accomplished this build in one night! The programming took another couple nights to iron out.
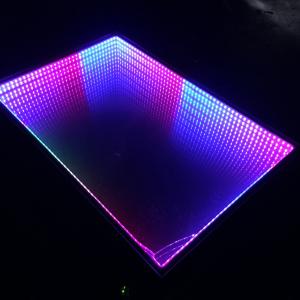
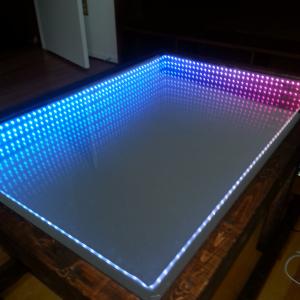
The Result

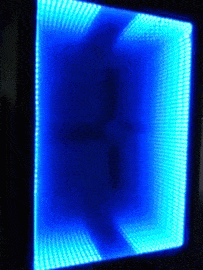
The Materials
- Arduino Uno Adafruit Neopixel 60 LED Strip (Black) - 4 Meters
- 36x24” Frameless Rectangular Mirror
- 30x36” Sheet of Plexiglass
- 2x3x8 Lumber x6
- Screws
- STRONG Double Sided Tape - Crucial for mounting LEDs inside the frame
- 3 ft. x 15 ft. Mirror Privacy Window Film - You will need an extra sheet or two, because you will mess this up the first time.
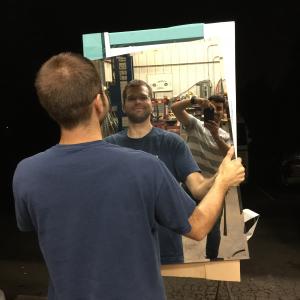
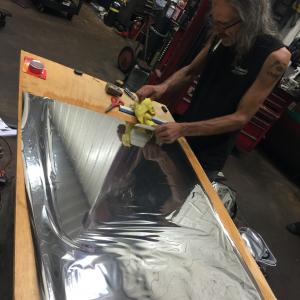
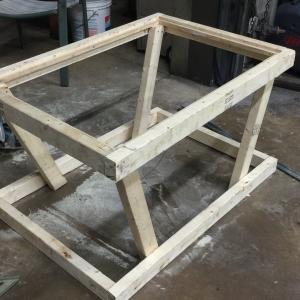
The Build
Matt and I got started by loading the Adafruit Neopixel Library + some test code onto our Arduino. We attached the Arduino to the LED strip and checked that everything worked.
We headed to Home Depot to pick up materials. It took a couple trips to get everything just right (and our original table design mutated into a new beast).


The code
Here’s a link to the code that I currently run on my table: Github
Here’s a sample Rainbow Chaser effect:
void setup() {
  strip.begin();
  strip.setBrightness(60);  // Lower brightness
  strip.show(); // Initialize all pixels to 'off'
}

void loop() {
  rainbowFull(15);
}

void offsetChaser(uint16_t i, uint16_t j, uint16_t offset) {
  uint16_t baseNum = i - offset;
  strip.setPixelColor(baseNum, Wheel(((i * 256 / strip.numPixels()) + j) & 255));    //fuckin' rainbows
  strip.setPixelColor(baseNum - 1, Wheel(((i * 256 / strip.numPixels()) + j) & 255));
  strip.setPixelColor(baseNum - 2, Wheel(((i * 256 / strip.numPixels()) + j) & 255));
  strip.setPixelColor(baseNum - 3, Wheel(((i * 256 / strip.numPixels()) + j) & 255));
}

void rainbowFull(uint8_t wait) {
  uint16_t i, j, c;

  for (j = 0; j < 256 * 5; j++) {

    for (i = 0; i < strip.numPixels() * 2; i++) {

      if (j % strip.numPixels() == i) {
        offsetChaser(i, j, 0);
        offsetChaser(i, j, 36);
        offsetChaser(i, j, 72);
        offsetChaser(i, j, 108);
        offsetChaser(i, j, 144);
        offsetChaser(i, j, 180);
        offsetChaser(i, j, 216);

      }
      else {
        //do nothing. this leaves the previous filled color
      }
    }
    strip.show();
    delay(wait);
  }
}
Here’s Matt’s version: Github
If you’re looking for fun programming challenges, why not tackle automatic fading in between RGB values? Amanda gave me ~50 RGb values that she wanted to slowly fade back and forth - quite a novel challenge to auto-interpolate brightness values. I learned a bit about pointers.
I also played around with the FastLED3.1 library, which is quite fun and rewarding to work with.
Many thanks to Mark Kriegsman for his work on the FastLED library.